Eclipse photos look simple until you try to make one. The Sun is bright enough to hurt your eyes and your gear, yet the scene also includes delicate detail in the corona, soft sky gradients, and a fast changing timeline. The good news is that you do not need exotic equipment. You need safe solar filtration, calm planning, and camera settings you can repeat without thinking.
Key takeaway
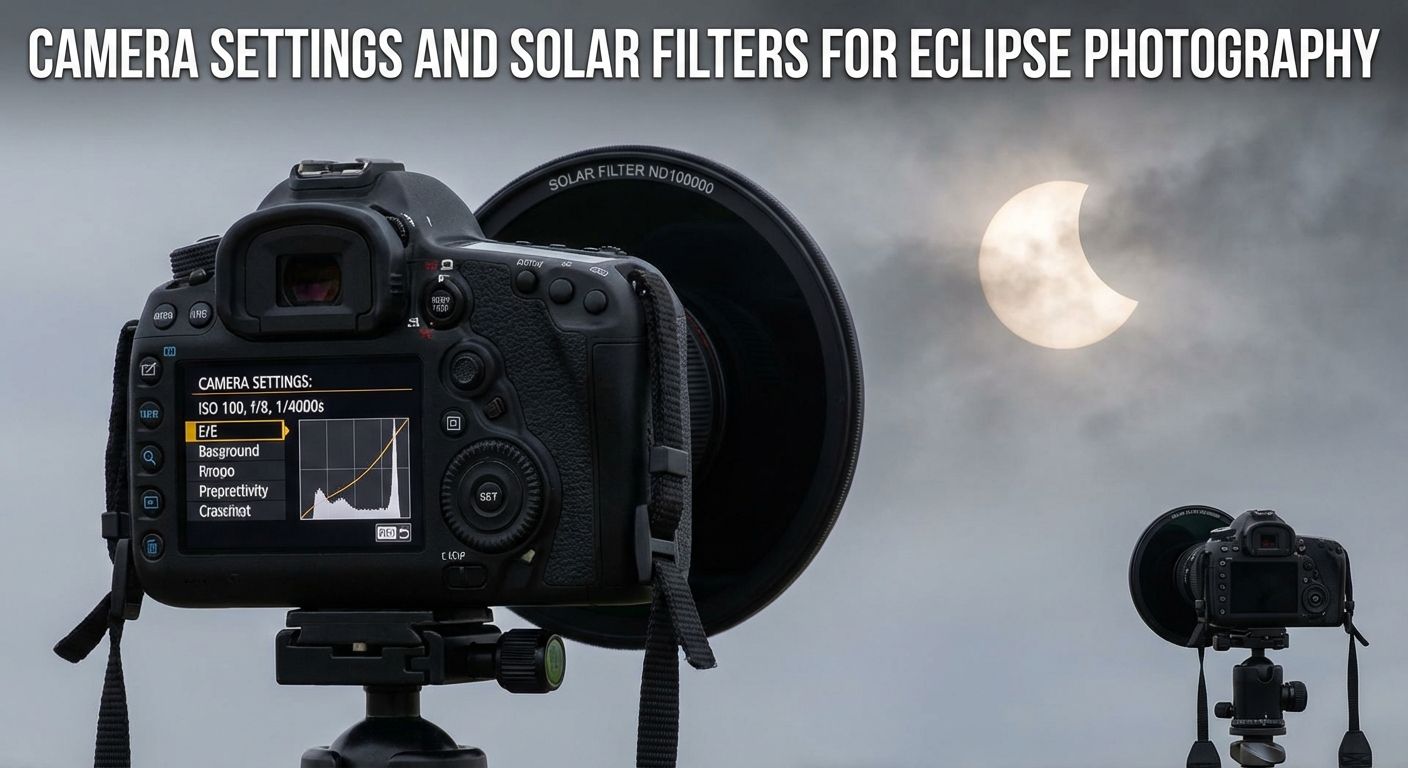
Safe eclipse photography starts with a real solar filter, full stop. Put the filter on for all partial phases. Use manual mode, low ISO, and a fast shutter, then fine tune with the histogram. Focus in live view, lock it, and stop touching the ring. For totality only, remove the filter and bracket exposures to catch both the inner and outer corona. Practice the full routine before eclipse day.
Quick eclipse photography quiz
Answer these to check if your plan is safe and solid.
Here is the core mindset, treat eclipse photography like a recipe. You set the safe ingredients first, filter and stability, then you pick a simple exposure range, then you rehearse the steps. If you want a calmer sunrise style vibe for your opener or your travel planning, this piece on morning light pairs nicely with eclipse prep: 20 facts about sunrise.
Solar filters you can trust and how to use them safely
A camera solar filter is not a creative add on, it is safety gear. The filter must go on the front of the lens, not behind it. You want a purpose built solar filter rated for direct viewing of the Sun. Many photographers use solar film in a rigid cell, or threaded glass solar filters made for photography. The goal is the same, cut the light to a level your sensor and your eyes can handle while keeping sharpness.
Avoid shortcuts. Sunglasses are not enough. Stacked neutral density filters are not a safe substitute. Improvised materials can crack or leak light. If you are shopping, look for reputable brands and clear labeling for solar use. If you are building a film filter, mount the film without wrinkles, keep it flat, and tape the edges so light cannot sneak around the sides.
Quick safety check before you shoot:
Bullets in one paragraph, check for pinholes by holding the filter up to a bright lamp indoors, confirm the filter cannot blow off in wind, keep the viewfinder covered or use live view, never point an unfiltered lens at the Sun outside totality, and keep curious friends away from the viewfinder.
If you enjoy the science side of what you are looking at, the Sun is not just a bright disk, it is a dynamic star with layers and activity. This companion read adds context that makes the photos feel more personal: 15 facts about the Sun.
Gear choices that make eclipse photography easier
You can shoot an eclipse with many cameras, from mirrorless to DSLR to some fixed lens models. The easiest setup is a camera with manual controls, a tripod, and a telephoto lens. A focal length around 400mm on full frame gives a satisfying Sun size in the frame. On crop sensor, 250mm to 300mm often lands similarly. If you only have 200mm, you can still get a clean Sun and crop later.
A solid tripod matters more than a fancy body. Add a ball head or a simple pan tilt head that locks firmly. A remote shutter or a two second timer avoids shake. If you have image stabilization, it can help, but do not rely on it to fix a wobbly tripod.
- Tripod: stable, with locks that do not slip
- Remote or timer: reduces camera shake
- Telephoto lens: 250mm to 600mm range works well
- Solar filter: secure mount, correct rating
- Extra battery and card: live view and bursts drain power
Camera settings for the partial phases, a simple baseline
During partial phases, the Sun is still the Sun. The filter stays on. Think of your settings like photographing a bright object against a dark background. Start in manual mode. Use a low ISO, a mid aperture where your lens is sharp, and a fast shutter. Then adjust based on your histogram and the look of the solar disk.
White balance is optional in raw, but a steady choice helps preview consistency. Daylight works fine. Autofocus can hunt, especially through dense filters. Live view magnification is your friend. Zoom in on the solar edge, focus until it looks crisp, then switch to manual focus to hold it.
How to focus on the Sun without frustration
Focusing is where many eclipse photos fall apart. The Sun looks sharp at a glance, yet at 400mm, a tiny miss turns the edge mushy. The safest routine is to focus in live view with magnification, then lock focus and stop touching it.
- Set up early so you are not rushing.
- Turn on live view and magnify the image.
- Focus on the solar limb, the edge, until it is crisp.
- Switch to manual focus to prevent changes.
- Take a test shot, zoom in on playback, and refine.
- After that, keep your hands off the focus ring.
If you plan to include the horizon or a landscape, focus becomes two problems at once. One trick is to shoot two sequences, one telephoto sequence for the Sun, and one wider sequence for the scene. Later you can present them as a series. If you are curious about how the sky changes around the Sun near dusk and dawn, this read adds a strong sense of atmosphere: How long after sunset does it get dark.
Settings for totality and why bracketing matters
Totality is the short window where the Moon fully covers the Sun. It is also the only time you can safely remove the solar filter for photos, assuming you are in the path of totality. The scene changes fast. The corona has a wide brightness range. One exposure cannot catch it all. Bracketing gives you options, and it also protects you from small timing mistakes.
A clean approach is to set a fixed ISO, choose an aperture your lens handles well, then vary shutter speed across several stops. If your camera supports auto exposure bracketing in manual mode, set it up in advance. If not, you can change shutter speed by hand, but rehearse the exact clicks you need.
Use raw. It holds more highlight detail and gives you gentler edits. Turn off long exposure noise reduction during totality if it delays the next shot. Turn off review time or keep it short, you can check sharpness once, then trust your process.
Exposure habits that keep details crisp
The histogram is your quiet helper. For partial phases, you want the solar disk bright but not blown out. If the right side is piled up, speed up your shutter. If the disk looks dull and gray with no crisp edge, you may be too dark, slow down a bit. Small changes are enough.
Metering modes do not matter much in manual, but they can fool you if you are in any auto mode. Avoid aperture priority for the partial phase unless you are very comfortable with exposure compensation. Manual gives you repeatable results, and repeatability is comfort.
One listicle of common mistakes and how to avoid them
- Filter not secured: Tape or clamp it so wind cannot lift it.
- Autofocus hunting: Focus with live view magnification, then switch to manual focus.
- Shutter too slow on long lenses: Use a fast shutter for partial phases, tripod for totality brackets.
- Touching the setup constantly: Lock down knobs and stop fiddling.
- Forgetting totality steps: Write a short checklist and rehearse it.
- Overheating and battery drain: Shade the camera between bursts, carry a spare battery.
- Only one exposure at totality: Bracket, even if you only keep one later.
How to plan your timeline so you actually enjoy the eclipse
The biggest quality jump comes from planning your minutes. The partial phase can last a long time, while totality is brief. Decide what you want most, a close up Sun sequence, a wide landscape, or a bit of both. Then assign tasks to each phase.
A practical plan is to get your partial phase close ups early, then switch to wide shots as the light changes. The landscape and sky can feel like a strange sunset at midday, with a warm band near the horizon. If you like chasing dramatic sky color, this piece on color science pairs naturally with eclipse prep: Science of sunset colors, red skies, green flashes.
- Early: setup, focus, test exposures, then shoot a clean partial phase sequence
- Mid: relax, check filter security, confirm focus still holds
- Final minutes before totality: rehearse the steps, filter off only at totality, start bracketing
- After totality: filter back on, then continue partial phase shots if you want a complete set
Including people and place without turning it into chaos
A telephoto close up is satisfying, yet the memory often lives in the environment, the light, the crowd, the shadows. If you can, bring a second camera with a wider lens. Set it on a second tripod or a stable surface. Keep its settings simple and pre focused.
If you are choosing a viewing spot, consider unobstructed horizons, stable ground, and easy access. Comfort matters. A good location can also turn your eclipse day into a sunset or sunrise style adventure, this guide can help you think about viewing angles and atmosphere: Best places to watch the sunset.
Editing and presentation that keeps the moment honest
Edits should support what you saw. For partial phases, a mild contrast boost and sharpening can bring back the edge. For totality, you can blend bracketed exposures to show more corona range, but keep it natural. Watch for halos and over sharpened textures. A gentle curve adjustment often does more than extreme sliders.
If you are building a story, a sequence works beautifully. Start with a clean partial phase frame, then a mid phase bite, then totality, then the return. This kind of arc is similar to how we experience twilight transitions and atmospheric shifts, this piece adds great visual language for that feeling: Afterglow, twilight, volcanic skies.
Extra tips for phones and small cameras
Phones can record the mood even if they cannot resolve fine solar detail. Use a proper solar filter made for the device or shoot the environment instead of a close up Sun. Lock exposure by tapping and holding if your camera app supports it. Lower exposure a bit so the sky does not blow out. For the Sun itself, a phone behind eclipse glasses can work in a pinch, but keep it steady and avoid long recordings that heat the device.
Phone friendly idea:
Film people reacting, the light on the landscape, and the sudden dusk feel. Pair it with a time stamp and a short caption. If you enjoy the cultural side of sunrise and sunset moments, this is a great companion: Sunsets symbolism across cultures.
Keeping your eyes and equipment safe while you shoot
Safety is simple, then it is strict. Outside totality, never look at the Sun through an optical viewfinder without proper solar filtration. Prefer live view. Cover the viewfinder to prevent stray light. Keep your filter on the lens and do not remove it for a better look. Clouds do not make it safe. If you are unsure whether totality is happening where you stand, treat it as partial, keep the filter on.
Also, watch heat. Leaving a long lens pointed at the Sun without filtration can damage internal parts. Even with filtration, do not leave it for long stretches unattended. Take short bursts, then rest the camera in shade.
A simple eclipse day checklist you can print
- Solar filter attached, checked for pinholes, secured against wind
- Tripod locked, remote or timer ready
- Manual mode set, raw enabled, ISO low
- Live view focus routine practiced
- Totality plan written, filter removal only at totality, then back on
- Spare battery, spare card, lens cloth
If you want to connect the eclipse experience to everyday sky watching, it can be fun to keep tracking sunrise and sunset times in the weeks around your trip. This guide can support that habit: Sunrise sunset timing and daylight.
Light, atmosphere, and the strange beauty around an eclipse
Even if your main goal is the Sun, the surroundings can be the most emotional part. The light can flatten, colors shift, and shadows feel crisp. Sometimes you will notice shimmering air or odd distortions near the horizon, especially on warm days. If you like that visual weirdness, this is a fun side read that fits eclipse travel days: Mirages and shifting sunset shapes.
If you are shooting from a town or city, consider how artificial light affects your wide shots. Even in daytime, bright signs and reflective surfaces can change your exposures. This piece gives helpful context for thinking about light in the built environment: Light pollution, dimming sunset and star lore.
A closing note for the photographer behind the camera
The best eclipse photo is the one you can make safely, calmly, and with enough attention left to feel the moment. Lock in the filter habit. Keep your settings simple. Practice until your fingers know the steps. Then, when the sky turns strange and the world quiets down, take a few frames and let yourself look up.